Categories
- Pipe & Tube (18)
- Flange & Fitting (97)
- Fastener & Gasket (12)
- Valve & Pump (18)
- Base Material (11)
- Equipment (8)
- Application (31)
- Technical (110)
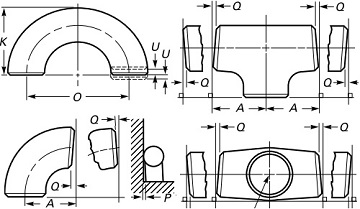
This article introduces both dimension and angularity tolerances for butt welding pipe fittings made in accordance with ASME B16.9. These fittings include elbows, tees, crosses, reducers, caps, 180° returns, and lap joint stub ends. Click the links in Table M to view the drawing and basic dimensions of various pipe fittings.
| ASME B16.9 Butt Welding Fittings | ||
|---|---|---|
| Elbow L/R | Reducing Elbow | Return L/R |
| Elbow S/R | Return S/R | 3D Elbow |
| Tee & Cross | Reducing Tee | Reducing Cross |
| Stub End | Cap | Reducer |
| End Bevel | Tolerance | Wall Thickness |
| NPS | O.D. (mm) [inch] | I.D. mm [inch] |
|---|---|---|
| 1/2~2-1/2 | (+1.6, -0.8) +0.06, -0.03 | (+0.8, -0.8) [+0.03, -0.03] |
| 3~3-1/2 | (+1.6, -1.6) [+0.06, -0.06] | (+1.6, -1.6) [+0.06, -0.06] |
| 4 | (+1.6, -1.6) [+0.06, -0.06] | (+1.6, -1.6) [+0.06, -0.06] |
| 5~8 | (+2.4, -1.6) [+0.09, -0.06] | (+1.6, -1.6) [+0.06, -0.06] |
| 10~18 | (+4.0, -3.2) [+0.16, -0.12] | (+3.2, -3.2) [+0.12, -0.12] |
| 20~24 | (+6.4, -4.8) [+0.25, -0.19] | (+4.8, -4.8) [+0.19, -0.19] |
| 26~30 | (+6.4, -4.8) [+0.25, -0.19] | (+4.8, -4.8) [+0.19, -0.19] |
| 32~48 | (+6.4, -4.8) [+0.25, -0.19] | (+4.8, -4.8) [+0.19, -0.19] |
| NPS | CtE1 inch [mm] | CtE2 inch [mm] |
|---|---|---|
| 1/2~2-1/2 | ±0.06 [±2] | ±0.09 [±3] |
| 3~3-1/2 | ±0.06 [±2] | ±0.09 [±3] |
| 4 | ±0.06 [±2] | ±0.09 [±3] |
| 5~8 | ±0.06 [±2] | ±0.09 [±3] |
| 10~18 | ±0.09 [±2] | ±0.12 [±3] |
| 20~24 | ±0.09 [±2] | ±0.12 [±3] |
| 26~30 | ±0.12 [±3] | ±0.25 [±6] |
| 32~48 | ±0.19 [±5] | ±0.38 [±6] |
| NPS | OVL1 inch [mm] | OVL2 inch [mm] |
|---|---|---|
| 1/2~2-1/2 | ±0.06 [±2] | ±0.12 [±3] |
| 3~3-1/2 | ±0.06 [±2] | ±0.12 [±3] |
| 4 | ±0.06 [±2] | ±0.12 [±3] |
| 5~8 | ±0.06 [±2] | ±0.25 [±6] |
| 10~18 | ±0.09 [±2] | ±0.25 [±6] |
| 20~24 | ±0.09 [±2] | ±0.25 [±6] |
| 26~30 | ±0.19 [±5] | ±0.38 [±10] |
| 32~48 | ±0.19 [±5] | ±0.38 [±10] |
| NPS | CtC inch [mm] | BtF inch [mm] | Aln inch [mm] |
|---|---|---|---|
| 1/2~2-1/2 | ±0.25 [±6] | ±0.25 [±6] | ±0.03 [±1] |
| 3~3-1/2 | ±0.25 [±6] | ±0.25 [±6] | ±0.03 [±1] |
| 4 | ±0.25 [±6] | ±0.25 [±6] | ±0.03 [±1] |
| 5~8 | ±0.25 [±6] | ±0.25 [±6] | ±0.03 [±1] |
| 10~18 | ±0.38 [±10] | ±0.25 [±6] | ±0.06 [±2] |
| 20~24 | ±0.38 [±10] | ±0.25 [±6] | ±0.06 [±2] |

Illustration of various tolerances for ASME B16.9 butt welding fittings.
| NPS | Q inch [mm] | P inch [mm] |
|---|---|---|
| 1/2~4 | ±0.03 [±1] | ±0.06 [±2] |
| 5~8 | ±0.06 [±2] | ±0.12 [±4] |
| 10~12 | ±0.09 [±3] | ±0.19 [±5] |
| 14~16 | ±0.09 [±3] | ±0.25 [±6] |
| 18~24 | ±0.12 [±4] | ±0.38 [±10] |
| 26~30 | ±0.19 [±5] | ±0.38 [±10] |
| 32~42 | ±0.19 [±5] | ±0.50 [±13] |
| 44~48 | ±0.19 [±5] | ±0.75 [±19] |
| NPS | G inch [mm] | R | LT |
|---|---|---|---|
| 1/2~2-1/2 | +0, -0.03 [+0, -1] | +0, -0.03 [+0, -1] | +0.06, -0 [+1.6, -0] |
| 3~3-1/2 | +0, -0.03 [+0, -1] | +0, -0.03 [+0, -1] | +0.06, -0 [+1.6, -0] |
| 4 | +0, -0.03 [+0, -1] | +0, -0.06 [+0, -2] | +0.06, -0 [+1.6, -0] |
| 5~8 | +0, -0.03 [+0, -1] | +0, -0.06 [+0, -2] | +0.06, -0 [+1.6, -0] |
| 10~18 | +0, -0.06 [+0, -2] | +0, -0.06 [+0, -2] | +0.12, -0 [+3.2, -0] |
| 20~24 | +0, -0.06 [+0, -2] | +0, -0.06 [+0, -2] | +0.12, -0 [+3.2, -0] |
Besides, a minimum wall thickness of 87.5% applies unless the purchaser specifies a different wall thickness tolerance.
